
Did you know that images can make up an average 21% of a total website’s “weight” (HTTP archive). This bulk can cause your site to load slower, frustrate users, and rank lower on search engines. Fortunately, there are multiple solutions to this problem to get your site trimmed down and running smoothly. In fact, image optimization alone can result in more dramatic increases in page loading time than many other tactics combined.
Table of Contents
What Is Image Optimization?
“Image optimization is a process of saving and delivering images in the smallest possible file size without reducing the overall image quality. “
– wpbeginner.com
Benefits of Image Optimization
As I mentioned, optimizing your images can have a direct impact on the usability, performance, and effectiveness of your site. None is more important than increasing page load time.
Speed has a huge impact on your audience, and your bottom line. According to Neil Patel:
- 47% of consumers expect a web page to load in 2 seconds or less.
- 40% of people abandon a website that takes more than 3 seconds to load.
- A 1-second delay in page response can result in a 7% reduction in conversions.
In addition to speed, other benefits can include:
- Improved SEO rankings
- Faster and more efficient backups
- Reduced hosting costs due to less storage and bandwidth usage
Choose Your File Format Wisely
Image compression is one optimization technique that can be accomplished using software, plugins, or online tools to decrease the file size of an image.
There are two methods of compression used for this — lossy and lossless. Lossless compression retains quality as the file size is compressed and can be brought back to original quality when decompressed. Lossy compression permanently removes image data, which results in larger file size decreases, but the image cannot be decompressed to its original size.
This can make more sense when paired with your different file formats. Not every format will be a good fit for your image. Let’s explore the common ones and their pros and cons.
- PNG – Generate high quality images but at the cost of a larger file size. PNGs support transparency and are a popular choice for logos and other graphics. Mostly a lossless format.
- JPG – Very flexible, JPGs use lossy and lossless compression. This format is best for photos and or complex images with multiple shadows or gradients.
- GIF – limited to only 256 colors, GIFs are the standard for animated images. They use lossless compression.
Size Matters
Not just file size but the actual dimensions on your images have a big impact. Even a full page image need not be 5,000 pixels wide when it would look just as good at 1,600 pixels wide. Does that team member headshot need to be 2,000 pixels tall or would 600 pixels tall be closer to how it will be displayed at full size on the page? Think about where your photos will live on the page and resize them appropriately.
The Big Three
“By combining the right combination of these three (image file format, compression type and image dimensions), you can reduce your image size by up to 80%.”
– wpbeginner.com
Putting It All Together

He’s my sample image. This would be for a hero section, slideshow, or the top or the featured image for a blog post. I’d like it to be the full width of the screen.
It’s pretty big. Untouched, the dimensions of the photo are 4,970 x 2,529 pixels and the file size weighs in at 9.3 MB!
Let’s bring it into Photoshop and optimize. I’m going to change the dimensions close to the actual size I’d like to use (1,600x 814 pixels). You see this reduces the file size as well.
Now I’ll use the Save for Web command (not regular save because that actually increases the file size). I have some additional options now. I can set the file type, compression quality, and make additional changes to the dimensions if I wasn’t pleased with the changes I made previously. You can experiment here and check the file size estimate in the lower-left corner as a result of your choices.
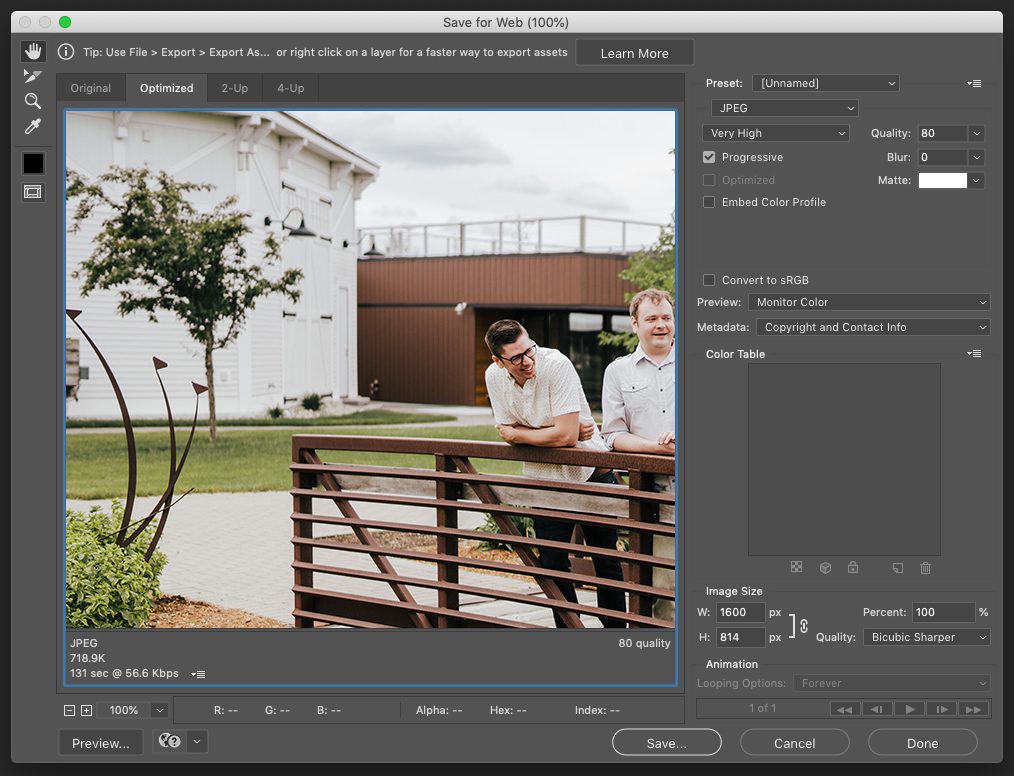
I know I want this to be a JPG because of the complexity of the image. I played with the quality/compression options and got the following results for file size:
Maximum: 1.43MB
Very High: 718K
High: 445K
Medium: 235K
Low: 114K
The preview changes with each choice to show you what the optimized image will look like. I’m going to go with Very High (718K). This is usually my go-to for images of this style. The file size is much more friendly and the quality is good for my purposes. More importantly, it’s a savings of 92 percent!
Don’t be afraid to tweak the settings to come up with a good balance between quality and file size. Depending on how many images you are using on a particular page, you probably want to keep them between 250-500K each.
Software and Online Tools to Optimize Your Images
You don’t need expensive software to optimize your images. Many of the options below are low or no cost and include online interfaces to quickly process images.
WordPress Plugins to Optimize Your Images
If you have a WordPress site you can run these plugins to automatically optimize your images upon upload, manually in batches, and a variety of other ways.
Conclusion
If you haven’t tested your website for speed lately, now is the time. One of the most impactful ways to increase your website speed is to optimize your images. With simple tools and a little time, you can make a difference that your customers, staff, and even Google will appreciate.

